Regulation Distance For Horseshoe Pits
Regulation Distance For Horseshoe Pits: Build Your Ultimate Backyard Game! Introduction Are you looking for an exciting outdoor game to add some fun to your backyard? Look no further than horseshoe pits! Horseshoes is a classic game that can be enjoyed by players of all ages and skill levels. To ensure a fair and competitive game, it is important to build your horseshoe pit according to the regulation distance specifications. In this post, we will guide you through the process of creating your own horseshoe pit that meets the official dimensions. So, grab your tools and let's get started! 1. Understanding Horseshoe Pit Dimensions To build a proper horseshoe pit, it is essential to understand the official dimensions. According to regulation standards, each pit should have the following characteristics: 1.1 Pit Length The length of each horseshoe pit should measure 48 feet. This ensures that players have ample space to stand and throw their horseshoes accurately. A properly sized pit creates a fair playing field for both beginners and experienced players. 1.2 Pit Width The width of each horseshoe pit should be 6 feet. This offers enough room for the horseshoes to land within the designated area without risking interference between pits. Maintaining the proper pit width is crucial to avoid disputes during the game. 1.3 Stake Placement The stake, also known as the "pin," is placed within each horseshoe pit. It should be positioned 40 feet apart from the opposing stake, allowing for an equal playing distance between players. The stakes should be firmly anchored, ensuring stability and longevity of your horseshoe pit. 2. Materials Needed for Building a Horseshoe Pit Now that you are familiar with the regulation dimensions, let's gather the necessary materials to build your horseshoe pit. Here's a list of items you'll need: 2.1 Wood or Metal for Pit Frames To construct the pit frames, you have the option to use either wood or metal. Choose materials that are durable, weather-resistant, and able to withstand the impact of horseshoes consistently hitting the ground. 2.2 Gravel or Sand To create a suitable playing surface, you'll need to fill the pit area with either gravel or sand. Gravel is a popular choice as it provides stability and helps with drainage. Sand, on the other hand, offers a softer surface for horseshoes to land on, reducing the chance of bounce-backs. 2.3 Stakes For the stakes, you can use 1-inch diameter metal bars or sturdy wooden poles. Make sure they are long enough to extend 14-15 inches above the ground to ensure visibility during gameplay. 2.4 Measuring Tape To ensure accuracy while constructing your horseshoe pit, a measuring tape is an essential tool. Use it to measure the distances for the length, width, and stake placement of your pit. 2.5 Level Keeping your horseshoe pit level is crucial for fair gameplay. A level will assist you in ensuring that your pit surface is flat to prevent any uneven bounce or advantage for players. 3. Steps to Build Your Horseshoe Pit Now that you have gathered all the necessary materials, let's dive into the step-by-step process of building your horseshoe pit. Follow these instructions, and you'll be ready to challenge your friends and family in no time! 3.1 Determine the Pit Location Choose a suitable location in your backyard for the horseshoe pit. Ensure that there is enough space to accommodate the length and width of the pit. Consider factors such as the overall layout of your yard, accessibility, and safety. 3.2 Mark the Dimensions Using your measuring tape, mark the dimensions of the pit on the ground. Measure 48 feet in length and 6 feet in width. For precise stake placement, measure 40 feet from the front of each pit to determine the position of the opposing stake. 3.3 Build the Pit Frames Construct two frames using either wood or metal, according to the marked dimensions. Attach the sides and corners securely to ensure the stability of the pit frames. Make sure the frames are level and flush with the ground surface. 3.4 Fill the Pits Fill the pit area with gravel or sand, depending on your preference. Ensure that the surface is level and even. The ideal depth for the filling material is around 4 inches, but you can adjust it based on personal preference and the level of play you desire. 3.5 Position the Stakes Install the stakes at each end of the pit, ensuring they are centered. Drive the stakes firmly into the ground, leaving approximately 14-15 inches above the surface. Use a level to ensure the stakes are perfectly vertical. 3.6 Finishing Touches Once all the above steps are completed, take a step back and inspect your newly constructed horseshoe pit. Make any necessary adjustments to the frames, filling material, or stake positioning. Finally, pat down the filling material to create a smooth and even surface ready for gameplay. 4. Frequently Asked Questions (FAQs) 4.1 How Many Players Can Participate in Horseshoes? Horseshoes is typically played with two opposing players or teams, with up to four players in total. Each player or team alternates turns, throwing two horseshoes per turn. 4.2 What Are the Rules of Horseshoes? The objective of horseshoes is to throw your horseshoes as close as possible to the opposing stake. Each horseshoe that lands within 6 inches of the stake scores one point, and landing a horseshoe around the stake itself earns three points. The first player or team to reach 21 points wins the game. 4.3 Can a Horseshoe Be Played on Any Surface? While horseshoes can be played on various surfaces, a designated pit with proper dimensions offers the best gameplay experience. The pit allows players to throw accurately without worrying about the horseshoes bouncing away or interfering with other players. Conclusion Building your horseshoe pit according to the regulation distance ensures fair and competitive gameplay. By following the guidelines presented in this post, you can construct a top-notch horseshoe pit in your backyard. Gather your friends and family, and enjoy countless hours of fun with this classic outdoor game. So, roll up your sleeves, grab your tools, and let the horseshoe games begin!  Image Source : www.pinterest.de
  Image Source : howtobuildit.org
 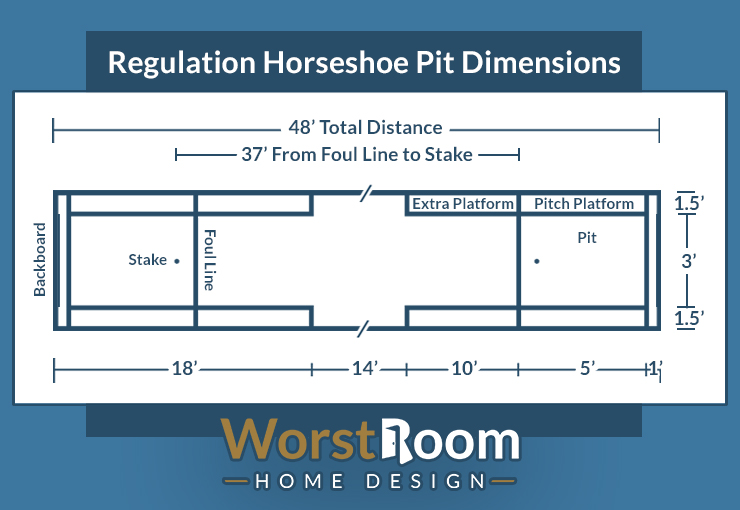 Image Source : worstroom.com
  Image Source : www.pinterest.com.mx
  Image Source : www.pinterest.com
  Image Source : www.courtcraft.com.au
  Image Source : beginpreppingnow.com
  Image Source : www.pinterest.com
Horseshoe Pits | Bar / Horseshoe Pits | Pinterest | Drink Holder
Image Source : www.pinterest.de DIY Horseshoe Pit | Page 3 Of 5 | How To Build It
Image Source : howtobuildit.org horseshoe pit backyard diy build outdoor horse pits shoe games yard projects brookegiannetti velvet linen landscaping typepad way howtobuildit back
Regulation Horseshoe Pit Dimensions: Official Sizes - Worst Room
Image Source : worstroom.com Horseshoe Pit | Backyard Games, Horseshoe Pit Dimensions, Horseshoe Pit
Image Source : www.pinterest.com.mx Build Your Own Horseshoe Pit For Your Outdoor Party This Summer
Image Source : www.pinterest.com horseshoe pit dimensions backyard horse shoe build diagram outdoor court pits games projects own regulation diy landscaping size horseshoes official
Horseshoes – Court Craft
Image Source : www.courtcraft.com.au horseshoe horseshoes incorrect
How To Build A Horseshoe Pit - Begin Prepping Now!!
Image Source : beginpreppingnow.com horseshoe pit
Official Horseshoe Pit Dimensions Diagram | How To Build A Horseshoe
Image Source : www.pinterest.com horseshoe pit regulation pits attract nhpa
Regulation horseshoe pit dimensions: official sizes. Diy horseshoe pit. Horseshoe pit. Horseshoe pit regulation pits attract nhpa. Horseshoes – court craft